Precautions for non-destructive testing of weld quality in the pipeline design stage
From the perspective of non-destructive testing of pipe weld quality, the following aspects should be considered in the design phase, so as to be more conducive to the implementation of inspection work and the improvement of project quality.
1. According to the considerations of pipeline grade, use, material, laying environment, trial life, economy and other factors, as well as pipeline welding technology, combined with the actual situation, in accordance with the engineering construction quality acceptance specifications, the strictness should be moderate, avoiding the implementation of standard control If it is too strict, it will cause repairs that do not need to be shown off, and improve efficiency and reduce costs without compromising the quality of the overall project.
2. The update of standards and specifications should be checked in time and the effectiveness of the standards should be evaluated to ensure that the standards, specifications, and implementation are effective.
3. The selection of non-destructive testing methods for pipe weld quality shall be carried out in accordance with the relevant provisions of the relevant construction quality acceptance specifications. The general principles are as follows:
(1) Surface nondestructive testing
For ferromagnetic material steel pipes, magnetic particle testing should be used; for non-ferromagnetic material steel pipes, penetration testing should be used. The application of surface non-destructive testing is carried out according to the standard requirements. The objects and applications of the objects are generally as follows:
A. Important butt weld surface defect detection
B. Inspection of important fillet weld surface defects
C. Inspection of surface defects of welded joints of important socket welding and jumper tee branch pipes
D. Groove detection of large welded joints
E. Non-austenitic stainless steel pipe groove detection with design temperature lower than or equal to minus 29 degrees Celsius
F. Double-sided weldment stipulates the inspection of the roots of the weld after root clearing
G. Defect detection of the repaired part when the welding fixture on the alloy pipe with the hardening tendency is cut by the oxyacetylene flame
(2) Radiation detection and ultrasonic testing Both radiographic and ultrasonic testing are applicable to pipe butt joints and to the detection of internal defects in butt joints of welded pipe fittings. For the inspection of welded joints of titanium, aluminum and aluminum alloys, copper and copper alloys, nickel and nickel alloys, the radiation detection method should be used.
4. Non-destructive testing ratio selection It should be considered according to the pipeline grade, inspection grade, regional grade, design pressure and laying environment. In addition, factors such as weld coefficient and weld joint type should be considered.
The types of welds cited in the non-destructive testing ratio are generally classified into fixed welds and movable welds.
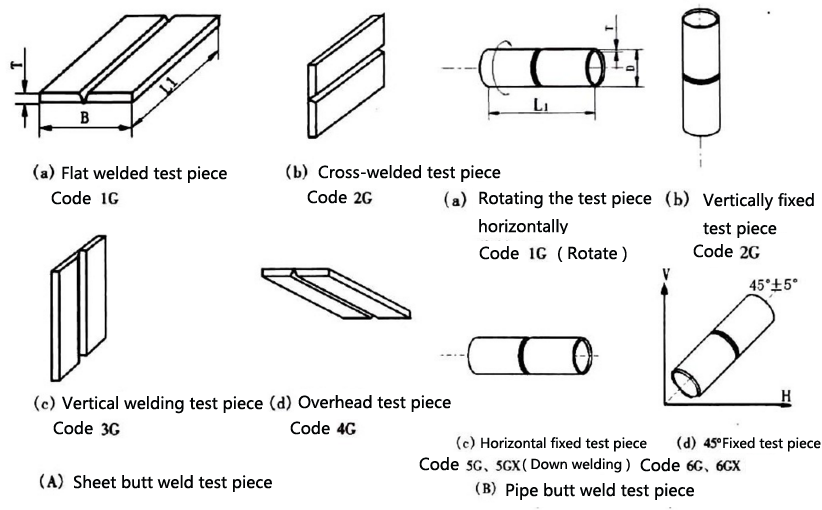
Fixed welding joint means that the weldment is fixed and is welded at all positions. Fixed welding joint welding orientation changes, making welding difficult, so try to avoid fixed welding. However, some workpiece welds are limited by the requirements of the site conditions or the conditions of the workpiece itself. When installing the weld, there is only a single direction weld, sometimes the last weld of a whole pipeline or equipment, so the ratio of non-destructive testing The column should be high.
Rotary welding joint refers to the welding welder during the prefabrication welding process of the pipeline. The welding weld can be rotated freely according to the most comfortable angle of the welding work, and the welding quality is relatively stable. Non-destructive testing is lower than the columnar fixed solder joint.
Test piece welding position and code
-
 Sales@hata-ndt.com
 -
 0086-0371-86172891

